Christmas Cookies Using Wood Cookie Molds | Recipe for Speculaas
Merry, almost, Christmas! I hope that this month isn't completely crazy for you. Each year I seem to put up less decorations, do less baking, simplify my shopping, and yet somehow it remains a busy time of year. I hope to share a little Christmas house tour later in the week. I still need to take pictures, so fingers crossed I don't get too distracted with anything else.
 I never want the preparations of Christmas to feel like a long to-do list. My goal is to take joy in the process and to be led by my heart. I try to create a warm and inviting place to celebrate and make those around me feel special and appreciated. Some years that means a couple planters full of fresh greens and a batch of sugar cookies, other years I go all out and every ornament is hung on the tree and each room has little seasonal touches. It is difficult to articulate, but you should only do what delights and inspires you. I hear so many people apologizing for not having it all together, for being behind on shopping, for not having their home all decked out, for running around and resenting it. Social media adds a whole layer of comparison and expectations because you see glimpses into other peoples lives your normally wouldn't and it just adds to the pressure. My kids don't have a clue what I choose to put out each year or if I use old wrapping paper or buy less, bake less, etc, but I'm certain they remember how much I love this time of year and how excited certain traditions make me. That's really all it is about. I say all this in preparation of sharing a new cookie recipe. One that is a little time consuming, though not hard, and one that yields a beautiful homemade package to share. I do this because it makes me happy. An afternoon spent in the kitchen, creating something pretty and delicious, with Christmas music playing, is like a gift for me. If that's not your jam, then embrace that too, rather than let it bring you down. :)
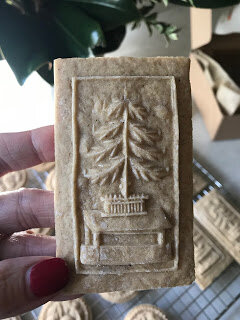
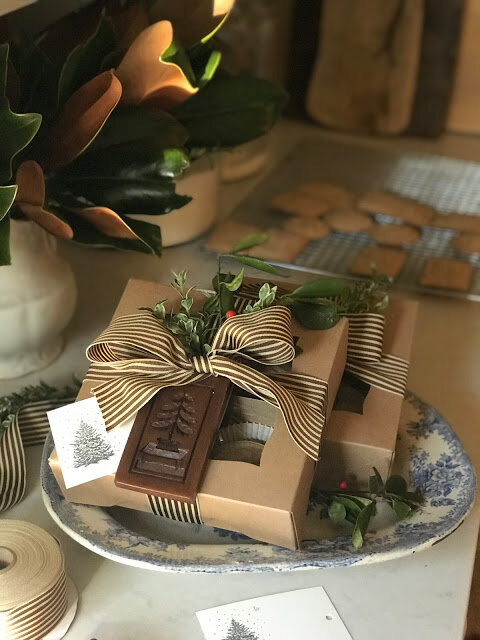
Here is the recipe, along with my notes. See the bottom of the post for a link to the cookie molds.
RECIPE | Speculaas Cookies (adapted from Martha Stewart)
Ingredients:
- 1/2 teaspoon baking soda
Directions:
1. Whisk together flour, baking soda, salt, cinnamon, ginger, nutmeg, cardamom, white pepper, and cloves in a large bowl.
2. Cream butter and brown sugar until light and fluffy. Beat in half the flour mixture. Beat in water, then remaining flour mixture. Shape into 3 disks. Pat each to a 1-inch thickness, wrap in plastic, and refrigerate for 1 hour.
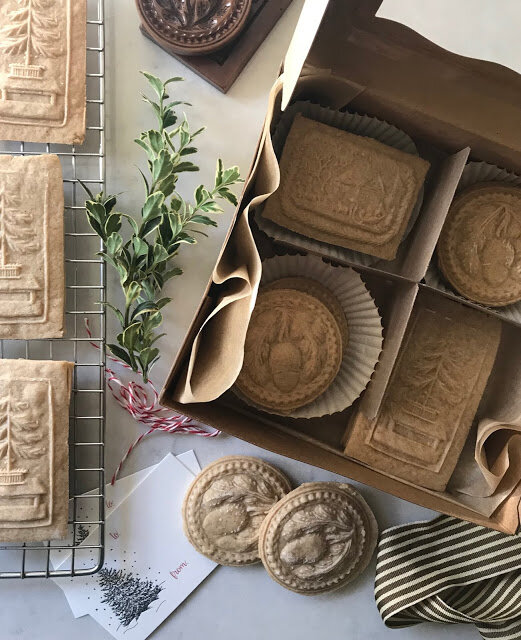
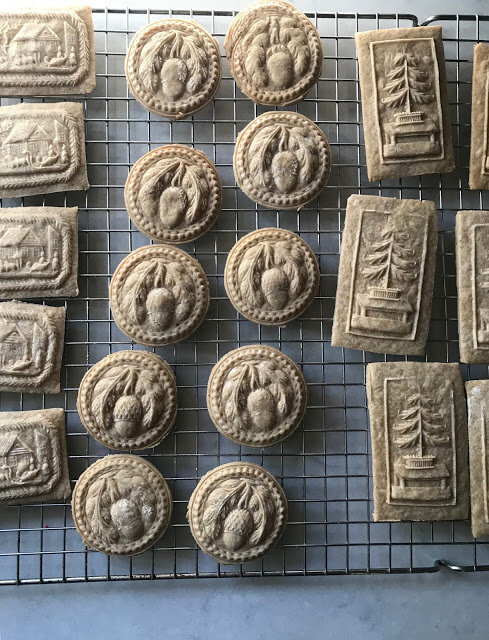
3. Dust surface of the mold lightly with confectioners' sugar. Roll out dough to a 3/8-inch thickness (deeper molds will need thicker dough). I rolled the dough out on a parchment sheet so as not to add ore flour, based in review of the recipe saying the dough was crumby. I very lightly dusted my rolling pin with flour before rolling. Press mold firmly into dough. I pressed down about 10 times with both hands. Then cut around the mold with a sharp knife. Gently coax dough out of mold with fingertips and onto a baking sheet lined with parchment. Repeat, spacing cookies 1 inch apart, and placing same-size cookies on same sheet. Freeze until firm, about 1 hour.
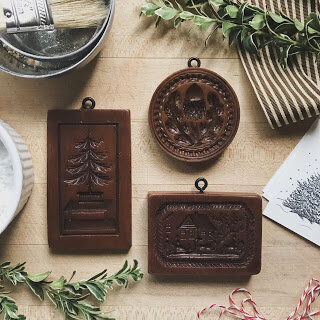
4. Preheat oven to 325 degrees. Place 1 sheet of cookies in oven, and immediately reduce temperature to 250. Bake, 1 sheet at a time, until cookies are set and just beginning to turn light gold around edges, 50-55 minutes. Let cool on sheets on wire racks.^Would also make a beautiful gift to include the mold with the cookies.Great for a baker or even a non-baker, since they can be hung as ornaments!^LINKS TO COOKIE MOLDS: